Calder Wire Sculpture for Fifth Grade

calder wire sculpture pinable

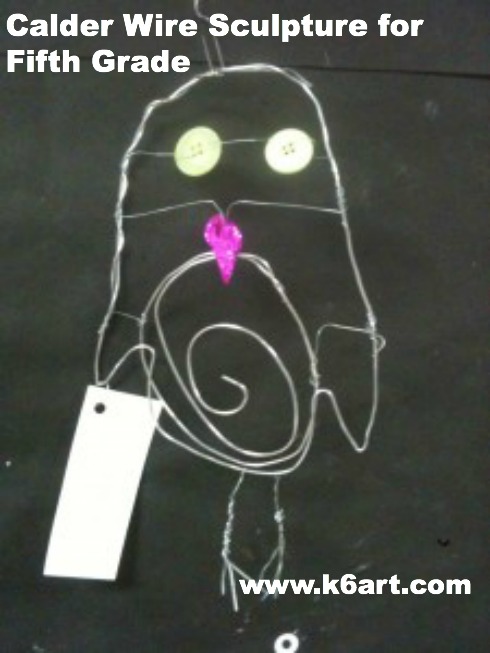
Of all the famous artists we study, students think Alexander Calder is the most fun.  Fifth graders made Calder-inspired wire animal sculptures.

Alexander Calder’s Fish (1944).


5th graders made wire sculptures focusing on contour. Allow 2-3 40 minute sessions.

 Materials:

Notes: When buying wire, the higher the gauge, the thinner and more flexible the wire. The wires below are soft enough for students to cut with our blunt-tip school scissors! Simplify your life and buy pre-cut 18″ floral wire (available at floral suppliers, Wal-Mart and Michaels).


  • spool of  Dick Blick 14-gauge Armature and Sculpture Wire , (cut one 3 ft. piece per student) (note: compensated affiliate link)
  • pre-cut 18″ floral wire, 20 or 22 gauge, ‘bright’ (silver-colored aluminum)
  • pre-cut 18″ floral wire, 26 gauge. I call this super-fine and flexible wire ‘sewing wire’ because it is fine enough to pass through sequins, beads and window screen.
  • embellishments: buttons, beads, sequins, aluminum pot scrubbers, pipe cleaners, aluminum window screen.
  • sketch paper (we use 8.5″x11″ copy paper)
  • markers for sketching
  • optional: Ziploc gallon-size storage bags for storing unfinished work between sessions

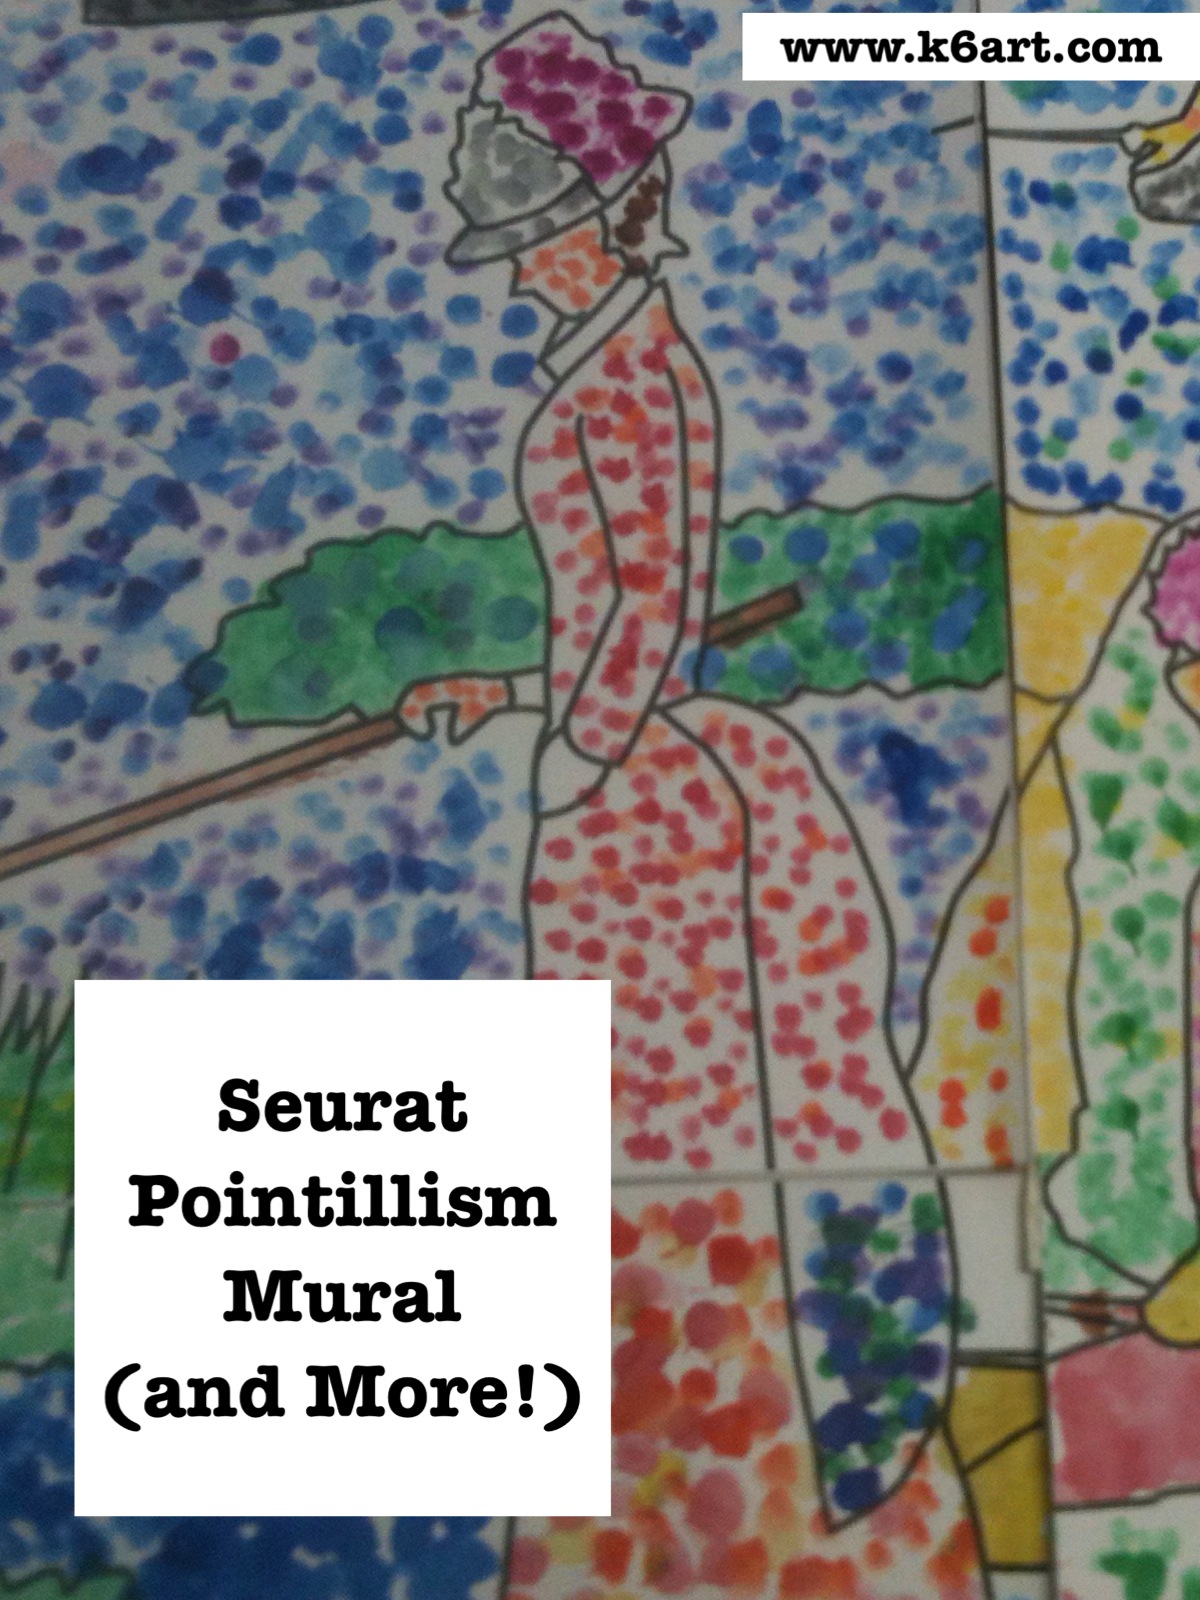
We begin by looking at this Calder wire sculpture Powerpoint. Next students sketch a contour drawing of an animal on copy paper. The sketch should touch all four edges of the paper and should be simple. Then students trace the contour with 14 gauge sculpture wire, overlap the ends and twist to secure.

Trace marker sketch with wire.

They can string shorter wires or pipe cleaners with beads, sequins and buttons across the center. Encourage kids to experiment.


We link up the sculptures in a chain (using my favorite paper-clip ‘S’ hooks) and suspend from the ceiling.  Instant group Calder mobile!

Calder’s art is so varied and interesting, you could do an entire unit: a mobile lesson, stabile lesson, a wire sculpture lesson, a circus lesson, even a jewelry lesson.

Do you love Calder’s art? Check out my posts on Calder’s jewelry , Calder wire portraits, and best wire sculptures of 2012.

UPDATE: Calder books to read online for free! Click here

NEW: click here: How to make a Calder mobile!


Note: I am an affiliate of Blick Art Supplies. I have been using Blick Armature and Sculpture Wire for nine years and LOVE it!

UPDATED: 11/23/13

Seurat Pointillism Mural (and more!)

Seurat Pointillism Mural group project uses $8 downloadable PDF

Need a group art project? 4th grade just completed a pointillism mural based on Seurat’s “Sunday Afternoon at the Island of La Grade Jatte”.

‘La Parade’ by George Seurat. 1889


Day 1:

Introduce pointillism. We discussed how Seurat made paintings in a whole new way: instead of blending colors, he placed different colors of dots side by side and let the viewer’s eye mix them.

Close up view:

I passed out some greeting cards with pointillist art and let students examine them closely. They really need to see the art works up close to appreciate how many dots Seurat put in his paintings (tip: pass out magnifying glasses for a close up view).  I added some great close-ups to this Seurat Powerpoint  (sadly I am not sure who posted this Powerpoint).

Pointillist notecards + magnifier

UPDATE: Thanks to Google Art Project, you can view A Sunday on La Grade Jatte at incredible zoom level (flash required).
Google Art Project has a Seurat from MoMA in its online collection: you can view Seurat’s ‘Evening, Honfleur’ at incredible zoom level. Notice that Seurat used dots on the artwork and the picture frame!
Individual warm-up project: make your name in dots on a 4.5″x12″ strip of paper. Color the background with dots as well. We used Q-tips and pan watercolors.

Make your name in dots as an introduction to pointillism.


Days 2-3:

Group project. I purchased the downloadable pdf mural ‘Sunday in the Park’ from Art Projects for Kids ($8). The pdf contains a 28-piece mural (perfect size for a 4th grade class!) which you print onto cardstock. Each student ‘dotted’ their respective part of the mural, using the coloring guide included in the download.


Seurat’s famous ” (aka ‘Sunday in the Park’). Seurat’s masterpiece contains over 3 million dots and took over 2 years to complete.


28 individual pointillist artworks come together to form Seurat mural.

The assembled mural is 55 inches x 40 inches.

We carefully assembled the mural by attaching long strips of masking tape on the seams (note: get a helper for assembly!). Bonus: it folds up like a map! Easy to store until the art show.

The completed mural.

The kids really enjoyed this project.  I did notice there was a lot of variety in the assembled mural – some students made a near-solid dot pattern with almost no white paper showing.  Others had sparsely dotted areas. Next year I will use this pointillism practice worksheet from Miss Young’s Art Room blog.

Pointillism worksheet from Miss Young’s Art Room blog.

Options:

Individual coloring sheet for ‘Sunday in the Park’. From Practical Pages blog.

Want an individual project based on ‘Sunday in the Park’? There is a great post including download on the Practical Pages blog.

Try out different materials for pointillism:

  • Q-Tip + tempera
  • Marker
  • Unused eraser tip from a standard pencil + pan watercolor
  • Unused eraser tip from a standard pencil + stamp pad

Stamp pad + eraser tip


How do you teach pointillism to your students? Leave a comment!

UPDATE 10/17/13:

NEW!!! Pointillism art project – make pointillist FOOD using watercolors, q-tips and markers! AWESOME pointillism video! Click here.

seurat pointillist food: Q-tips, pan watercolor and markers. Very successful!

*****Thanks for visiting! Don’t forget to please vote for 2012 Art Ed Blog of the Year, which you can do by clicking this link and voting for K-6 Art! Voting open through December 14, 2012.******


Paul Klee Painted Desert for Third Grade

3rd graders stamped a line landscape with black acrylic paint, then painted with pan watercolors. Allow two 40-minute sessions.

Do you want a landscape lesson plan that delivers gorgeous art with 100% success in only two 40-minute sessions? Try the Paul Klee lesson featured in the book Dynamic Art Projects for Children by Denise M. Logan. Students spent their first class using black acrylic paint and small pieces of mat board to stamp a jagged landscape. They painted with watercolors during the second class. Here are the results:

Dynamic Art Projects for Children is a fabulous book with many colorful, engaging lesson plans for kids in grades 1-6.  I wrote about the book’s Kuna mola lesson plan in this post.

Can you recommend a book with awesome lesson plans?  Leave a comment!


Tasty Cakes: Scratch Foam Printing with Watercolor Markers

Maybe you have used scratch foam for printmaking in the art room. I’ve seen a lot of beautiful art work using scratch foam and printer’s ink applied with brayers. But did you know scratch foam prints can look like this?

This set of four cupcake prints were all made from the same scratch foam plate during a single 40-minute class.

3rd graders used watercolor marker and scratch foam to create multiple prints. We did an easy directed drawing of a cupcake onto scratch foam, colored the foam with watercolor markers, and then printed the cards onto damp paper.

Materials:

  • Scratch foam, cut to desired size
  • sketch paper, cut to same size as foam
  • dull pencil
  • masking tape
  • watercolor markers in assorted colors (I use Mr. Sketch markers)
  • oil pastels or other embellishments (optional)
  • shallow tub (dishpan) of water
  • beach towel (several if you are teaching multiple or large classes)
  • plastic sleeve protectors for printing station
  • white construction paper for printing – cut larger than scratch foam

Prep:

Set up a printing station. Fill tub with water depth of 2-3 inches. Set out a folded towel. Tape a sleeve protector to the table. Slide in an alignment sample (see below).  Cut a stack of printing papers, enough for each student to make at least 3 prints. Think about drying space (always an issue when printing multiples). Drying rack? Clothes line?


Drawing

  • draw cupcake onto sketch paper.  Click here for my step-by-step  how to draw a cupcake instructions.
  • Remind students: NO LETTERS, NO WORDS, NO NUMBERS.
  • tape sketch paper on top of scratch foam.
  • go over cupcake sketch with a dull pencil.  The lines should transfer to the scratch foam below.
  • pull up the paper.  Drawing directly on the foam, go over any lines you missed with the pencil.  You can also add sprinkles or other small lines at this time.
  • discard the sketch paper and tape.

Tape sketch on top of scratch foam. Go over lines with dull pencil to incise foam below.

Inking

  • use the watercolor markers to ink the scratch foam.  Students should use multiple colors.  Fill the scratch foam completely with color.

Color in the scratch foam with watercolor markers.


Printing

  • take your foam to the printing station.
  • write your name in small letters on white construction paper. Use pencil.
  • dip white construction paper in water
  • put wet paper in folded towel to blot
  • align inked scratch foam on sleeve protector INK SIDE UP
  • put damp white paper on scratch foam NAME SIDE UP (align using the sleeve protector)
  • rub paper firmly without wiggling
  • PULL THE PRINT

Printing station. Students align foam with white rectangle, damp paper with blue rectangle.


http://www.youtube.com/watch?v=sAY0pGj7c7g&rel=0

The third graders were amazed!!!! Vibrant colored cupcakes for their beautiful birthday cards.

ARE YOU READY FOR EVEN MORE FUN?????

Re-inking

  • Students re-ink the scratch foam plates using a different color scheme.  It doesn’t matter if the plate still has a little color on it – go right over the plate with a different color.

Print again!

Students should carefully sign their name on the back of the foam plate WITH PENCIL. Write small.


A word of caution: as always, test this project out yourself before attempting with your students.

1) The degree of dampness of the printing paper is critical.  Too dry and the ink won’t transfer to the paper.  Too wet and the ink will bleed and blur as the paper dries. For blotting, a fresh beach towel is ideal. My towel was too damp by the third class of the day. I wish I had a couple of fresh dry ones with me. Next year!

2) Size of drawing matters. Tiny drawings the size of a thumbnail just won’t look good.

Day 2: Embellish Prints with Oil Pastels

Students have the option of embellishing their dry prints.  These cupcakes are decorated with oil pastel. This is a great way to rescue students less-than-perfect prints. Can you imagine these with a little clear glitter and/or a sequin?

Next we trim our cupcake prints and glue them onto colored construction paper. What fabulous birthday cards for all our family and friends.


Fun – colorful – successful – easy to clean up!

This would be a great Wayne Thiebaud lesson plan – it relates to his dessert paintings in terms of subject matter and repetition.

Wayne Thiebaud. Cakes. 1963


A huge thank you to Carol Catelano Webb, master art teacher, who taught this printing process at a San Diego Art Educators workshop back in 2005.


Cool Color Monet Water Lilies

cool color monet waterlilies

Second grade is studying the cool colors.  After watching the excellent elementary color theory DVD Getting to Know Color in Art  we looked at photos of Monet’s beautiful garden and pond in Giverny, France. Students could imagine themselves at the pond on a summer day, feeling the willows sway, listening to frogs as they rested on the lily pads, resting in the cool shade, even floating in Monsieur Monet’s ‘art boat’ as it passed under the Japanese bridge.

“Le Bassin aux nymphéas” 1899. One Monet’s many water-lily paintings.

We looked at several of Monet’s waterlily paintings, focusing on his use of cool colors and short, quick strokes of paint. You can download my Powerpoint of Monet’s garden here.

We then created an oil pastel and watercolor art work.

Allow three 40-minute sessions for this project.

Materials:

  • 12×18 construction green construction paper
  • 9×12 watercolor paper
  • glue sticks
  • oil pastels in blues, greens, and purples plus white, yellow and pink
  • watercolors in blue, green and purple
  • kosher salt (optional)

Discuss Monet’s art, his pond and garden. Review cool colors. View powerpoint or photos of Monet’s garden.

Fold green construction paper ‘hamburger’ (the short way). Glue watercolor paper to lower half of green paper.

Students use oil pastel to draw bridge, water lilies and foliage.

Review painting of pond and Japanese bridge.

Oil Pastel:

Using oil purple and blue oil pastels, draw three arcs (‘rainbows’) for the Japanese bridge. Add some vertical lines to the bridge to finish. Blend and highlight with white oil pastels.

Review photos of water lilies.

Using various green and yellow oil pastels, draw clusters of lily pads on the watercolor paper. The lily pads don’t have to be perfect – just ovals or quick strokes of pastel. They should overlap a bit. Add a few pink lily flowers, highlight with white.

Fill the entire top half of the green paper with foliage in greens and yellow. Use short strokes. Add a downward cascade of short lines for the weeping willow.  Tell kids to ‘go behind’ the Japanese bridge.

Use short strokes of oil pastel to completely fill the green paper with foliage.

Painting:

Using the cool colors (blue, green and purple), paint the watercolor paper using long horizontal strokes.  Colors can overlap and blend.  Go right over the oil pastel lily pads.

Use purple, blue and green watercolors on the lower half of artwork

Students may add a small pinch of Kosher salt to the wet watercolor. The salt absorbs a bit of color and an additional dimension to the pond. Brush off salt when dry.

Wow!!! This project was a hit! We learned about a famous artist, reinforced color theory, experienced the joy of painting on watercolor paper and blending pastels. All kids were very proud of their artwork. Success!


Enjoy!


(Note: post updated 12/22/13)

Related Posts Plugin for WordPress, Blogger...