I inherited a treasure trove of old Arts and Activities and School Arts magazines from the 1960s and 1970s.
Plaster sculpture cast in a wax paper milk carton. Inflated balloons create interesting negative space.
The balloons created terrific negative space. It reminded me a bit of Henry Moore’s sculptures. I thought it would be cool to try this out as a Henry Moore sculpture lesson with my art campers. We looked at some images of his work, then got busy.
The campers were able to scrape and shape the damp plaster.
It was a huge mess, of course. But fun! The kids (ages 8-11) really enjoyed the process.
How about a cool, retro how-to-draw book? You can read What to Draw and How to Draw It online. The second graders loved drawing owls using the illustrations in this book.
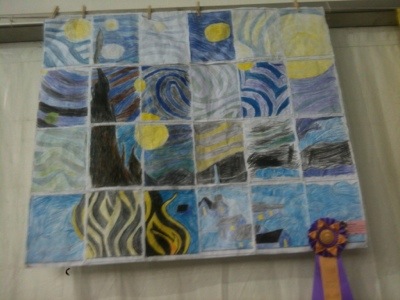
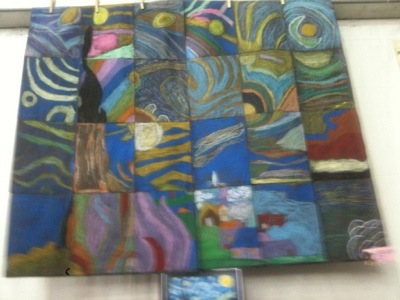
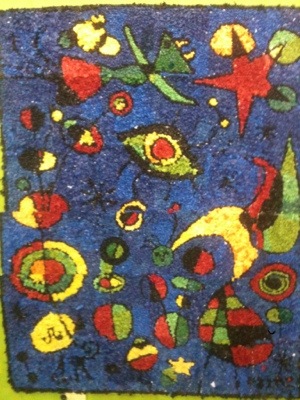
Happy summer! I just visited the youth art display at the San Diego County Fair. I saw three fabulous murals you might want to try with your students. All the artworks were made using the downloadable materials available at Art Projects for Kids.
The Van Gogh-inspired murals look completely different from one another. Each used different media. The bottom mural was made using oil pastel.
The assembled Miro-inspired mural was entirely covered in little balls of colored tissue paper. I have never seen anything like it! It looked like a carpet.
Unfortunately, I did not see the names of the teachers who made these wonderful projects with their students. If you know who did – please leave a comment!
P.S. – I am a big fan of the APFK downloadable murals. I did the Seurat mural with two 4th grade classes, and wrote about it in this post.
This year our art show featured a famous artist scavenger hunt – with a special twist : we used smartphones and QR codes to discover facts about famous artists.
We added square black and white QR (Quick Response) codes to all of our famous artist displays.
What are QR codes?
Some of you reading this are very familiar with QR (Quick Response) codes, but many are not. QR codes are square, black and white, pixellated computer-generated images. You need a smartphone (or camera-equipped iPod touch or iPad) plus a free scanner app to read a QR code.
Teacher uses a smartphone to scan the Modigliani QR code.
What happens when you ‘read’ (scan) a code with your smartphone?
Your smartphone opens to a new website, or displays text of your choice.
How To Read a QR code:
download a free scanner app (we use Red Laser) to your device
scan the QR code
Example:
Our QR (Quick Response) code for Pablo Picasso.
Here is the text you get when you scan QR code 8 above:
‘Pablo Picasso was born in Spain. He painted every day of his adult life. He is famous for his Cubist artworks. Kindergarteners made collage portraits inspired by Picasso’s unusual portraits.’
If you are reading this and own a smartphone, pull up this post on a laptop or computer and give it a try. I was actually able to scan my own computer screen using the Red Laser app.
How to generate your own QR codes (its easy and free):
The generators allow you to add your own text. We entered a brief 250-character statement about each famous artist, and then generated the code.
Why?
Our school is piloting a 1:1 iPad/iPod touch program in the 4th grade. The entire grade is utilizing the devices in the classroom. I thought the QR code scavenger hunt would be a fun way to integrate technology with art education, to get parents involved with technology, and just to have a fun family activity at the art show. Many parents were completely unfamiliar with codes – it was great to see kids showing their parents how to read them.
Two (awesome!) fourth graders, Max and Arman, generated the QR codes for all 10 famous artists for the 2012 art show, our 4th grade teachers, and fabulous parent volunteer M.B.G., who prepared all the forms and signage for the scavenger hunt.
The 5th graders showed off their amazing wire sculptures at the art show last week. We had about 70 – the biggest group to date. I want you to see some of the best examples, and how we displayed them.
Mariel (middle horse) and Natalie (dog) were able to sign their names in wire.
Connor was able to sign his name in wire.
Fish, pig and camel. Early finishers made name art.
How to Display Wire Sculpture:
Our silver-colored sculptures look best against a solid, dark background. We hung blue vinyl table covering (from a roll) across a wall. We attached twine in front of the covering, and hung the sculptures using paper clips (opened to form an ‘S’ hook).
Completed wire sculpture display.
Great job fifth graders!!!
Kudos to the parent volunteers who helped out in the art room every week. We really appreciate your efforts.
Thanks to our fabulous art show chair and her husband for designing and installing this display. That was a lot of hard work!