30-Minute Chihuly Chandelier

30 minute chihuly chandelier

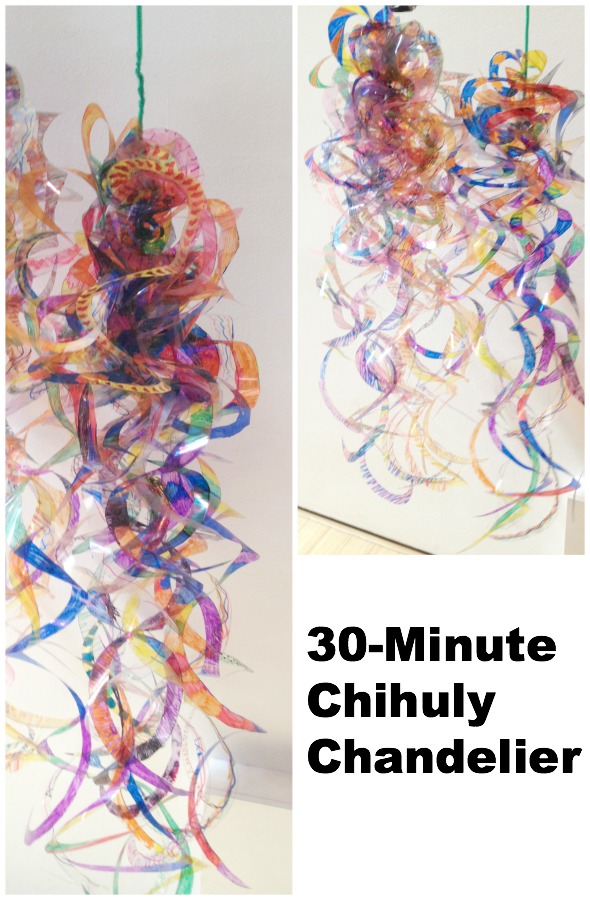
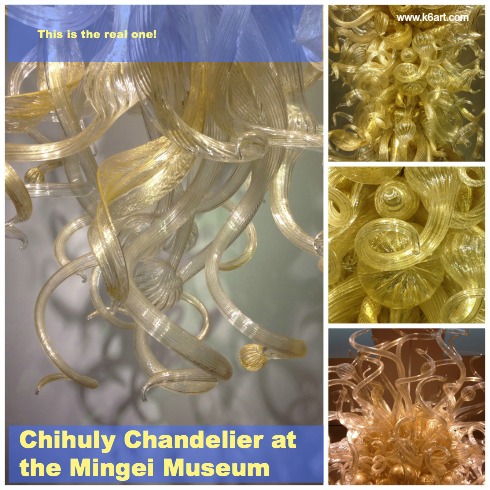
Dale Chihuly makes fantastic, organic-shaped glass sculptures.  They are in collections all over the world. This summer I saw the Chihuly chandelier at San Diego’s Mingei International Museum and participated in a group art project taught by art educator Jackie Hwang.

Mingei Museum Chihuly Chandelier

Materials:

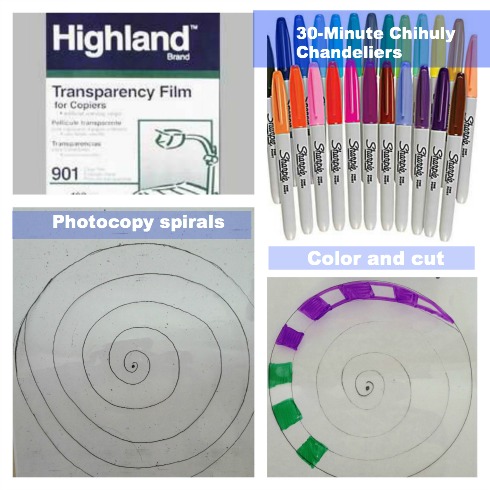
  • Overhead transparencies (like these  – make sure they are made for photocopiers)
  • photocopier
  • colored permanent markers (colored Sharpies or Art Color permanent markers)
  • scissors
  • pipe cleaners for assembling chandelier
  • UPDATE: single-hole punch
  • UPDATE: OPTIONAL rubbing alcohol and cotton balls

spiral acetate chihuly

Prep:

Jackie photocopied a spiral onto overhead transparencies. She made two sizes of spirals – a full sheet size, and a half sheet size containing two spirals.

The Art Project:

Families colored the spirals and cut them out, then turned them in to Jackie for assembly. Coloring time depended on the complexity of the design (but took FAR less than 30 minutes).

Assembly:

UPDATE: carefully punch each spiral on the tiny dot at the center of each spiral.

UPDATE: OPTIONAL: You may experiment with smearing the spirals with a cotton ball lightly dampened with rubbing alcohol. This will cause the colored sharpie to smear and blend. It’s a different look, and it takes extra time. Totally optional!

Jackie created the chandelier form using a mix of the large and small spirals. She used a couple of pipe cleaners to suspend the spiral clusters.

Jackie’s project is perfect for grades K-6. It would be super for art teachers on a cart, or art teachers that teach at multiple schools. You could fit the photocopied transparencies and all the other materials you need for this project in a tote bag.

Here is a 4-minute video of Dale Chihuly from the CBS morning show

Special Notice for San Diego Teachers and Parents:

  • Teachers: Do you want to take your class to the Mingei Museum? The Mingei provides free admission for all K-12th grade tours as long as they’re scheduled in advance.
  • Parents: The Mingei is free to San Diego county residents and military the third Tuesday of the month. Monthly Family Sundays offer admission and fun activities for just $5/family. Go to www.mingei.org for more details.

Coming up in the next post: two more Chihuly-inspired projects.

What’s your favorite Chihuly project?

Art + Cooking Camp: Degas, Sculpture and Chocolate Fondue

We had a fabulous time all week at my Paris-themed art and cooking camp. On the last day, we wrapped up our sculpture project and made yummy chocolate fondue.

20130723-173625.jpg
20130724-122304.jpg
A couple of campers wanted to make animal sculptures. They used foil and plaster or white Sculpey polymer clay to create their creatures. Not so Parisian, but I love how they turned out.

20130723-174158.jpg

20130723-174222.jpg

20130723-174240.jpg
The recipe for chocolate fondue was the easiest of all our recipes this week: 8 oz. of chopped semi-sweet chocolate heated with 1/3 cup of half-and-half. Pound cake cubes, whole strawberries and sliced banana tasted delicious dipped in the warm chocolate.
So much fun!

Enjoy!


Let’s Go to Paris! Art + Cooking Camp
Day One: Crepes and Monet
Day Two: Madeleines and the Eiffel Tower
Day Three: Meringues and Degas
Day Four: Cherry Cake and Pointillism

Art + Cooking Camp: Cherry Cake and Pointillism


IMG_0839

Bonjour! Here is an update on Day Four of my Paris-themed art and cooking camp. Today we tried out pointillism and made cherry clafoutis.

Pointillism

Pointillism is lots of fun for kids. They love the idea of creating art from dots of paint. We looked at pointillist artworks under extreme zoom at Google Art Project. Click here to see the extreme close up of Seurat’s ‘The Circus’ and click here to see Signac’s ‘The Port of St. Tropez’. For the art project, we did this fun Signac lesson with coloring sheet from the Practical Pages blog. The kids dotted their sheets using damp Q-Tips and pan watercolors. They filled in the tiniest areas with dots of colored marker.

One student made a pointillist cake! She lightly sketched her design in pencil, then filled in with dots of watercolor and marker. When it was dry, she erased the pencil lines.

(note: if you are looking for a whole class pointillism assignment, check out this Seurat mural project).

Cherry Clafoutis

We made a cherry clafoutis – a lovely French summer dessert with a texture that is a cross between a cake and a custard. CLICK HERE FOR THE RECIPE. Surprise – the kids LOVED pitting fresh cherries!

IMG_0831

Coming up later this week: the last day of art and cooking camp. Chocolate fondue and the completed Degas sculptures!

Art + Cooking camp:

Au Revoir and Bon Appetit!

Enjoy!


Eiffel Tower Art Project for Bastille Day!


printed eiffel tower 3


I just finished my Paris-themed art and cooking camp. The kids loved to make these printed Eiffel Towers. The project is inspired by this fabulous post at the Cassie Stephens blog (please check out the post – it has excellent directions!).

We used white craft paint and 1″x2″ pieces of mat board to print our Eiffel Towers. When dry, we added detail with chalk pastels and hand-made stencils.  Finally we added pastel fireworks outlined with glue and glitter.  Some kids stuck on gummed stars to make the Parisian night sparkle.

Just in time for Bastille Day on July 14!

printed eiffel towers 1

printed eiffel towers 2


The kids loved this brief video of fireworks at the Eiffel Tower.

In my one week Paris-themed art + cooking camp, we made crepes, meringues and madeleines! Click here, here and here to see our other art and food projects (with recipes).

Au revoir!

Enjoy!

Art + Cooking Camp: Meringues and Degas

Today was Day Three of my Paris-themed art and cooking camp. We began by making meringues and ended by beginning our Degas-inspired sculptures.

Meringues:

Meringues are really fun to make. CLICK HERE FOR THE RECIPE (AND VIDEO!). We had lots of practice separating eggs. Then we whipped those egg whites and sugar up, up, up into glossy peaks, and piped them onto the baking sheets using a pastry bag and a star tip. The kids had a lot of fun making ‘custom’ giant and mini meringues, and trying to make letter-shaped meringues.

making meringues

Unfortunately, meringues take forever to bake – at least two hours at 200 degrees F. Then they have to cool. So we won’t taste the completed meringues until tomorrow. Not the best choice for a three-hour AM camp. It was humid today – another meringue no-no. Oh well, at least we didn’t bake them on the last day of camp.

Degas-inspired Sculpture:

We talked about Degas. Degas was a French artist who is famous for creating snapshot-like pastel artworks of racehorses and ballet dancers. Unlike the other Impressionists, he did not focus on the quality of light, and created his work indoors (Actually, Degas did not consider himself an Impressionist). After his eyesight started to fail, he switched to sculpture. He initially sculpted his famous ‘Little Dancer Age 14’ in wax on a wire armature; it was later cast in bronze.

We created wire and foil armatures and covered them in plaster wrap. Some kids are creating dancers and some are creating animals. This took about an hour.


degas sculpture art campTomorrow we will make cherry clafouti and finish up our sculptures.

Enjoy (and bon appetit!)

Do you like to cook? Have you taught anyone to cook?

Related Posts Plugin for WordPress, Blogger...