Analogous Color Chameleons

Analogous Color Chameleons


Are you looking for an engaging, NEAT color project? Try these analogous color chameleons, made with watercolor paper scraps and Crayola markers.

Materials

  • Color wheels
  • Watercolor (or drawing paper) scraps
  • Sharpies (or other black permanent markers)
  • Crayola markers (or other fine tip watercolor marker)
  • Brush
  • Water
  • Construction paper
  • Construction paper crayons
  • Pipe cleaners
  • White glue

We began by watching this FUN chameleon video

http://www.youtube.com/watch?v=KMT1FLzEn9I

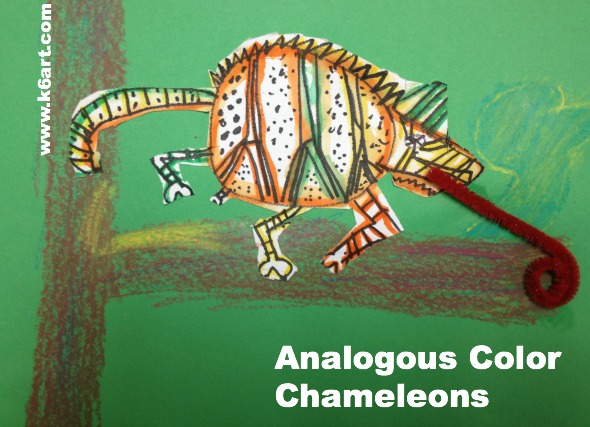
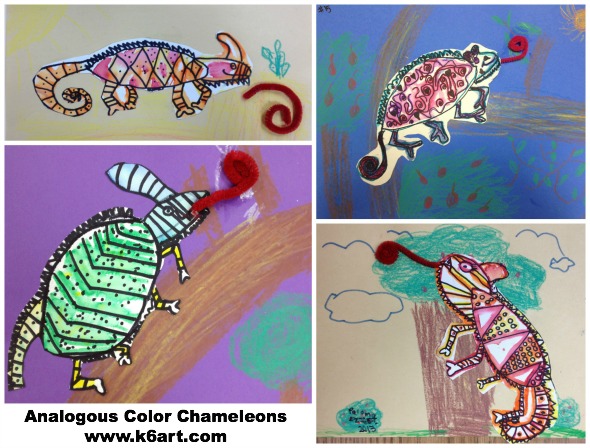
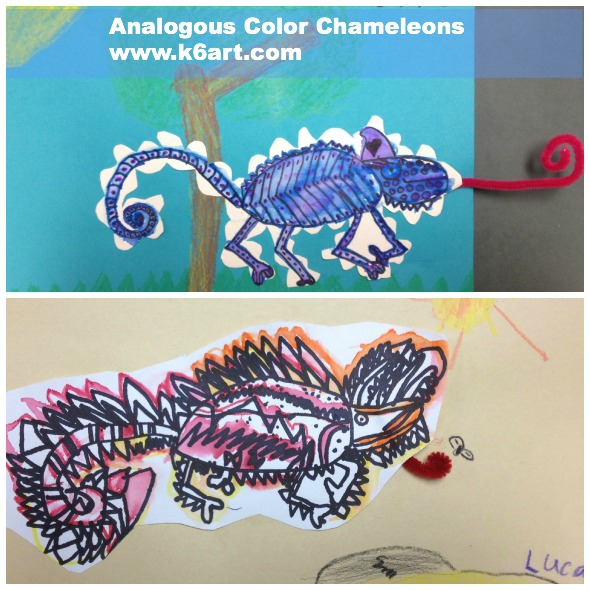
We did a directed draw of the chameleon using Sharpie on watercolor paper. Second graders then added their own details – stripes, patterns, dots, horns, and spikes.

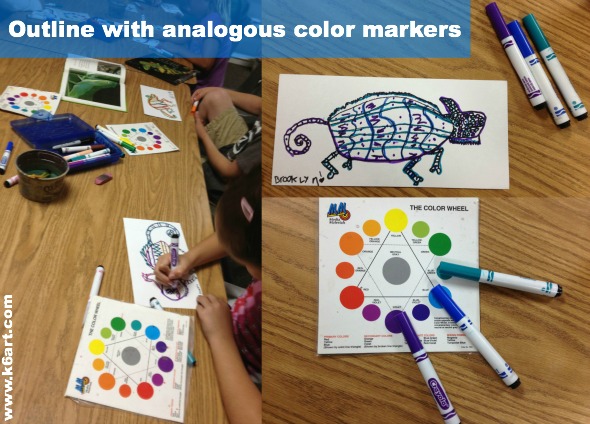
Next I passed out the color wheels and Crayola markers. We talked about analogous colors as ‘next door neighbors’ on the color wheel. I asked the students to select three analogous color markers and lay them out on their color wheels.

Students checked their neighbor’s work to make sure all the markers were analogous colors.

We used the ‘marker painting’ technique I learned on the fabulous Artisan Des Artes blog. Students outlined the interior of their their chameleons with the markers, then went over the lines with plain water and a small paintbrush. The kids LOVED it when their markers turned to ‘paint’ and spread through the watercolor paper.

analogous color collage

To finish the project, we cut out the chameleons and glued them to simple habitats drawn with crayon on construction paper. For a final touch, some student glued on a curled pipe cleaner for a tongue (I will skip that step next year!).

Second grade results:

analogous color chameleon collage 1

analogous chameleons


Guess what…….this project will work even if your markers are a bit dry! It’s a great project for end-of-year or anytime.

Enjoy!

p.s. Here are two books my students LOVED!


(note: this post contains compensated affiliate links).


Creative Self-Portraits at Young Art Show


Young Art 2013 at San Diego Museum of Art

For over 80 years, the San Diego Museum of Art has held a juried exhibition of student art. This year’s show is all about identity. Young Art ‘The Story of Me’ is on display right now at the Museum at the Center for Community and Cultural Art. Learn more in this article.

Our school had a record 12 pieces in this year’s show. Congratulations to all our young artists! Here are all their fabulous projects, arranged by grade:

First Grade: Clay Self-Portraits

matt and grace

 First Grade: Royal Self Portrait

L. and her royal self-portrait

L. and her royal self-portrait


Second Grade: Super Hero Self Portraits

super hero collage young art

Dream Catcher Girl

Third Grade: Heritage Self Portrait

Gavin’s heritage self-portrait, ‘Flag Face’, incorporates the flags of France and Italy.

Fourth Grade: CD Case Double Portraits

cd case portrait collage


 Fifth Grade: Charm bracelets and dog tags

Mo and his charm necklace

Mo’s self-portrait is a T-shirt and neck chain, with charms for skiing and Spiderman.


Bella's charm bracelet has charms for Mexico, swimming, Disneyland and more.

Bella’s self-portrait charm bracelet includes charms for Mexico, swimming, and Disneyland.

Jacob's salute to his family's military background includes a camouflage shirt and individual dog tags for family members in the service.

Jacob’s salute to his family’s military background includes a camouflage shirt and individual dog tags for family members in the service.


Well done artists!!!! The show is up until May 26, 2013. Hope you can visit!

Thanks to the fabulous art education team at SDMART for making Young Art happen. Our community truly appreciates all your hard work.

Enjoy!


Mondrian Cake, Rothko Pie and Dali Salad

Want to make a Mondrian cake?  Rothko’s favorite pie? Dali’s salad? Check these out, just in time for Mother’s Day.

Mondrian Cake from Modern Art Desserts

Modern Art Desserts by Caitlin Freeman

Modern Art Desserts is a brand-new cookbook by Caitlin Freeman, pastry chef at San Francisco MOMA’s in-house cafe. She has the AWESOME job of creating desserts that look like the artworks in the museum.

Watch Caitlin make her Mondrian cake here:


This would make a fun Mother’s Day gift (or art club challenge!).

Rothko’s Pie from The Artist’s Palate

Rothko apple pieFor a traditional (and easier) dessert, make Mom Mark Rothko’s Birthday Apple Pie. It was his favorite – his wife made it every year for his birthday. Click here for the recipe . The Artist’s Palate cookbook contains recipes and complete menus for lots of artist-inspired meals.

Dali’s Salad from MoMA Artists’ Cookbook

Back in the ’70s, New York’s MoMA published Museum of Modern Art Artists’ Cook Book. The cookbook is full of interviews, anecdotes and RECIPES from 30 modern artists of the day.

MoMA cookbook

Click here for recipes by

  • Louise Bourgeois
  • Robert Motherwell
  • Dali
  • De Koonig

As cookbooks go, this one is the wild card. In truth, the artistic Mom in your life may prefer you DON’T make her the Dali salad for Mother’s Day brunch. But what did you expect from Dali? Cole slaw? Try De Koonig’s Dutch Breakfast instead.

(Thanks to ACraven blog for posting the recipes)

Hope you have a great Mother’s Day with the artistic lady in your life.

Enjoy!

Clay Project Ideas from Prague

I just came back from Prague. WOW. In addition to castles, cathedrals and pastry, I had the joy of checking out hand-made crafts in small shops throughout the city. These clay sheep and owls were so adorable I just had to try them myself!!!

czech clay sheep

I saw these charming clay sheep tiny gift shop on the Charles Bridge. The shop was so tiny only two people could enter at a time! The ceramic sheep are wheel-thrown clay bells, covered in clay spiral ‘wool’. They are unglazed.

My version of the Czech sheep:

spiral clay sheep

Top view

Top view

I started with an inverted pinch pot, stuffed it with newspaper, and added face, ears, and spirals. I will let them dry, bisque fire, then do a cold finish by painting with tempera or watercolors, then rinsing off in the sink.

I think this would work for grades 4-6, and take around 45 minutes -1 hour to teach.

Verdict: I showed my sample to my 6th grade helpers: they LOVED it.


czech clay owls

The Czech Owls:

These beautiful, textured clay owls were hollow clay cylinders with closed bases. A hole was poked in the base to keep the owl from exploding in the kiln.

My version of the Czech owl:

I started with two pinch pots, stuffed them with newspaper, and sealed together to form a cylinder. I smoothed the cylinder by rolling it back and forth on a board. Next I tapped the bottom on the board to flatten. Finally I wiped the cylinder with a damp sponge to smooth it out.

I textured the clay, and added wings and a beak. I would have liked to have some different texture stamps for the eyes….still, they turned out OK.

I poked a skewer through the bottom to let air escape when firing.

I will let dry, and bisque fire. These owls could be glazed, or just painted with watercolor and sprayed with clear gloss.

clay owl 1

IMG_3517

These would take about an hour to make. Sixth grade and middle school.

You could also simplify this by using a single inverted pinch pot for the owl body. Be sure to stuff with crumpled newspaper before adding texture. This could work for grades 4-6.

Verdict: my 6th grade helpers thought my owls looked like penguins!!! They recommended making smaller eyes and bigger wings. They definitely preferred the sheep.

Although I did not bring home the Czech clay sheep or owls, I couldn’t leave that awesome gift shop empty-handed! I left with this fabulous Beethoven sgraffito mug as a gift for my husband.

sgraffito mug


Well, spring break was awesome but it’s over. Back to work!

Enjoy!


Rainbow Fish: Glazed Clay Fish

rainbow glaze clay fish

So many fish in the sea!

Our sixth grade finished the slab clay fish project. Although I provided a choice of  just three templates, students were able to customize them through re-shaping, texture, and glaze. We ended up with a wide variety of fish.

These three rainbow fish started from the same template. Artists scratched lines into the wet clay to make stripes. Later they painted these defined areas. Students who did this technique ended up with neatly glazed fish. Caution: avoid scratching a line across the narrowest part of the tail – it will be more likely to break.

mariel's fish

Want to make a rainbow fish? Make shallow lines in wet clay with a skewer. Glaze fired clay – try to stay inside the lines!


Morgan's fish

Here is a different rainbow fish.  The artist used a different template, then created texture with tiny balls of clay and the eraser tip of pencil. The fish is trimmed with a thin clay coil, which the artist later glazed shiny black.

NICE WORK SIXTH GRADERS!!!

I wrote how to roll and cut the fish here and here. More glazing examples here. More examples next week!

Related Posts Plugin for WordPress, Blogger...